Read part two here.
Read part one here.
The blocking process has always been a bit elusive to me. I’ll do it of course, because I know I’m supposed to, and I know that it’s essential, especially for a garment like this one. But I will admit that, in the past, I have skipped blocking my finished objects as often as possible. This is not for any good reason other than basic impatience to have the project finished (there’s nothing like the satisfaction of changing a Ravelry status from “WIP” to “FO”). But just like so many other aspects of knitting and crochet, I’ve learned the hard way not to cut corners (some of you may recall the lovely gold and blue sweater that turned into a longish indoor jacket in 2014. Pictures are pre-blocking. It’s a good 20% bigger now since the cashmere bloomed. Wash your swatches!).
As of yesterday, I had finally finished each section of the sweater: back, left front, right front, and both sleeves. What remains to be completed is the seaming (sewing up the sleeve seams, and joining all five pieces together), the button band, and the folded hem at the bottom. But before the seaming can begin, the five pieces must be blocked. The reasons for this are many, but the few that stick out most to me in my experience are as follows:
- They just look way better. I don’t know about you, but when I’ve finished a piece of a garment, especially one that is mostly stockinette, it curls and rolls and flops around and people say, “oh are you making something for a child?” Post-blocking, they look much more like they’re supposed to, and I’m able to say, “why yes, that is a sleeve!” which is always gratifying.
- They are much easier to seam together. Washing and drying allows the stitches to get up, stretch, and go for a walk. When they come back, they feel much better and are more willing to sit a row quietly behaving themselves than they were before. This makes it easier to pick up stitches, and to find corresponding spots from sleeve to body, and front to back. Un-blocked pieces are more likely to cause trouble in the seaming process and you could e
 nd up having to rip out the sewing and re-do it, which is way less fun than ripping out knitting.
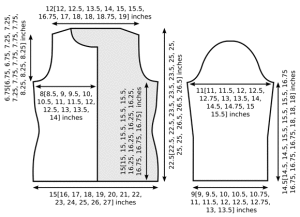
 - Measuring. If your pattern is worth it’s salt, it will include a schematic (see Ann Weaver‘s Tempest schematic included here). At this point, you can grab your measuring tape (or ruler, or metre stick, or tapeline) and see how close your measurements match where they’re meant to be. The fun thing is, if your piece doesn’t quite lie at exactly 11.5″ wide (as my sleeves should be), now’s your chance to stretch the piece a bit and pin it down. If you’ve used natural fibres, it should dry and hold that measurement better than if you hadn’t pinned and measured in the first place.
I feel pretty confident in my measurements of my pieces. The back and fronts are both longer than they should be, but that’s because I added 12 rows to each of them. I have a weirdly long torso (and stubby little legs!), so I often make tops and sweaters a bit longer to help me not look too freaky. Since Tempest is written in stripes, I simply added an extra “stripe” to all the pieces. This will change the number of stitches I need to pick up for my front bands, but since the pattern doesn’t give me a set amount, I needn’t worry. More on that in part 4.

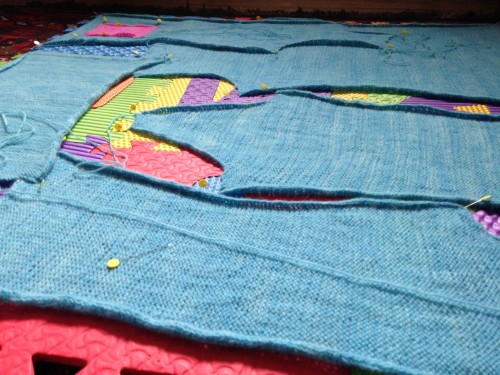
Here we have all my bits, drying out and ready to be seamed. They are now hiding under a beach towel since my feline roommate loves bits of yarn and pins beyond the fair points of reason and safety. I think the bit I’m most proud of is the right front. Note the cute little pink pocket! I’ve never put a pocket in anything before, but my friend Kathryn is working on a wicked man’s cardigan and used a skeinette of Rhichard Devrieze‘s Peppino (only $4 in store!) to line the pocket with a complimentary colour, and I stole her idea. The skeinette was enough for a pocket and a bit of leftovers – I bet I could have done two pockets, but I decided one was enough. Here’s what it looked like pre-wet blocking:
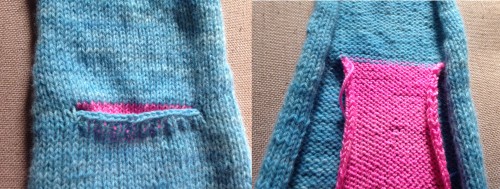
Hopefully the front will lie a little flatter once it’s dry and the lining is sewn into place, we’ll find out together! And as a bonus for reading this far, I give you my roommate Felix helping the pocket to lie flat. Now that I’ve gotten over the blocking hump on this project, seaming never takes me too long. It’s too much fun to pull everything together, and I’ll share a few tips on the next post about how I like (read: how Brenna taught me) to pick up stitches for the front bands and bottom hem. xo!

This series is great! Can’t wait to see the final garment!