One of the absolute best things about working in a yarn store is that we often get to be there, from beginning to end, for a huge number of projects. Sure, we don’t knit or crochet them ourselves, but we get to be a part of choosing the yarn, the pattern, often the needles, even swatching, customizing, mistakes, disasters, solutions, casting off, blocking, and if we’re lucky, trying on the final item, or giving it a snuggle when you the customer bring it back into the store to proudly show it off.
Today, I’d like to introduce you dear readers to a new Yarns Untangled blog feature called “The Making Of.” Through this feature, we’ll flip the situation around and take you on a journey through the birth, maturation, and arrival at adulthood of an entire project, warts and all (I’m hoping for at least a few warts, because projects are way more interesting when there are challenges and we learn something, right?).
Ok so here we go. Your official introduction. World, meet The Cardigan:
The Yarn: Mineville Wool Project #2701 Angora Wool
The softest and just a bit fuzzy, we’ve all been in love with this bunny yarn ever since it arrived. At 480 metres for an 100 gram skein, the mileage is undeniable, and the talented ladies of Mineville have sent us a gorgeous array of colours. Until very recently, we had wrongly assumed that this yarn fell under the fingering weight category, but according to Ravelry, it’s actually more like a DK. After swatching with it (details below), I can report that due to its angora content, this yarn can be used as either a fingering, sport, or even DK weight yarn if treated right. The mileage, colour range, and flexibility of this stuff renders it a perfect sweater yarn.
The Pattern: Tempest cardigan by Ann Weaver, Weaverknits
I have had this sweater queued for years. The shape, cut, shoulder line, and general aesthetic are right up my alley. The only reason I’ve skipped over it for other patterns is because I found the gauge requirement daunting. This knitter had a hard time wrapping her mind around getting a 20 stitch (and 30 row) gauge with a fingering weight. For those who are reading this and going, “…huh?”: a brief explanation. I won’t go into a lecture about gauge, that’s for another blog post and should probably be written by Brenna because she knows all the things. But I will say that fingering weight yarn, depending on the needles you’re using, usually yields a gauge that is closer to the 24-28 stitches per 4 inches range (even 30, if you’re making socks). Which means that in order to get a 20 stitch gauge (a more standard gauge for thicker, worsted weight yarn, in my humble opinion), I’d need some much bigger needles than I’d usually use with fingering weight, thus yielding a loose and less-structured fabric than I like for my sweaters.
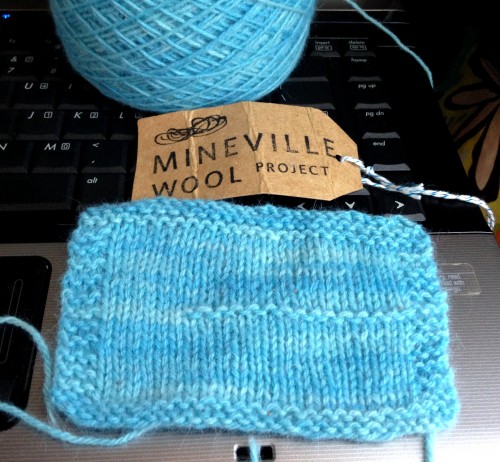
Enter: Mineville Angora. As stated above, it’s tough to label a weight on this yarn because it’s so flexible, but Brenna and I were both pretty sure that I’d be able to make this pattern and yarn match because angora is notoriously fuzzy and a bit bloomy, meaning it will grow to accomodate a looser fabric. That means it’s time for the swatch. For those unfamiliar with swatching, we recommend the Knitty.com article on the subject, which says it infinitely better and more thoroughly than I could. I have learned the hard way, and way more than once, that swatching is a must. I’m not here to lecture you, but just trust me on this one. Here’s my fuzzy little square:

All right, so “square” isn’t exactly the most accurate terminology that I could have used; there are two needle sizes at play here, so perhaps it’s a gentle trapezoid. This guy was cast on and banged out in a few minutes. I then cast off, soaked it in lukewarm water, and lay it flat on my desk to try overnight. Washing matters because you aren’t not going to ever wash your sweater, right? And once a fabric is washed, it can behave rather differently than before, so we are better safe than sorry.
What we see here is a test of two different needle sizes to see which one would be closer to the pattern’s requirements. The bottom half is knit with a 3.5mm (US 4) and the top with a 4mm (US 6). Usually I would also have done a 3.75mm one as well, but I didn’t bring that set of tips with me to Ottawa for Christmas because I wasn’t thinking. The pattern calls for a 4mm anyway, so the data on top will be most telling. The bottom half is more to give me a fuller picture of how this yarn behaves in general since I’m not familiar with it.
The two sections are separate by most of a line of knits on the purl side. I probably should have completed the line as it does seem to have made things look a bit funky, being incomplete. MEH.
After careful measurement and remeasurement (counting stitches and rows in a couple different spots on the swatch), I get 11 sts/2″ on the bottom half and 10.5 sts/2″ on the top (22 and 21 respectively). In terms of rows, it’s coming out at about 34 rows = 4″ on the bottom and 32 rows = 4″ on top. So for those scoring at home, I haven’t hit gauge. I’m close though! So before starting properly on the sweater, I’m going to need to do one more swatch. My expectations are that a 4.5mm (US 7) needle should do the trick.
Stay tuned for the next installment of The Making Of: A Cardigan, which I’m hoping will consist of swatch the second and casting on for reals. Thanks for reading!
To track this project in real time, check out the Ravelry project page.