Author Archives: Amelia Lyon

Lichen and Lace Knit Along

It’s time to announce our second knit along!  Thanks to all the knitters and crocheters who took part in 2015’s Lanesplitter Skirt KAL (great pictures and details on many of the projects can be seen on the Ravelry thread).  This time we’ve decided to take a slightly different tack on the traditional pattern-based KAL, so instead of working on the same pattern as a group, we are opening the doors of possibility wide!  Inspired by the unprecedentedly beautiful yarns of Lichen and Lace, we would like to invite each and every one of you to join us in working on a project of your choice in one (or more!) of Megan Ingman’s stunning yarns.  Two weeks from the publishing date of this post, we will be placing a massive custom order of Lichen and Lace yarn.  Megan has agreed to dye batches as small as single skeins, so there are no limits on the type of project you can do.  We’re also pleased to offer a 10% discount on any special orders of four skeins or more, regardless of base or colourway.

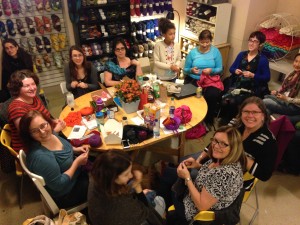
But first, what is a knit along (or “KAL” for short)?  A knit along is, loosely, a period of time where a group of knitters (and crocheters!) join together to work on a similar project, usually on the same pattern, benefiting from each other’s experience, enthusiasm, and learning from each other’s mistakes and triumphs.  Perhaps Larissa and Martin John Brown said it best in their book knit along: Celebrating the Tradition of Knitting Together when they said, “for some knit alongs, the purpose is…part friendship and part collaboration, friendly competion, inspiration, learning, and giving.”  In the case of our KALs, we will set a start and end date for your project, and once the end date has passed, we’ll award a few special prizes to lucky crafters who win in specific categories (see below for the knitty gritty).  Although the prizes are a fun extra incentive, the point is to learn something new, tackle a project you’ve been eyeing for ages, meet new people, and try out some beautiful new yarn.  Yarns Untangled KALs come with the offer of extra help on Sunday afternoons.  Any and all KAL participants are welcome to come to our drop-in clinic on Sundays from 4-7pm, free of charge.  We will use this time slot as an informal meeting time for KALers to come, sit, chat about their project, meet each other, and ask any questions they might have about their project.

All right, so now that we’ve got that explained, let’s move on to the important part:

Pressed Flowers Poppy Teal Tide Orchid2 Clover Amber Amethyst Baby Leaves Rainy DayCitron3 Wild Flowers (2) Sweetpea Pewter huckleberry Marsh Lily

Meet the Yarn

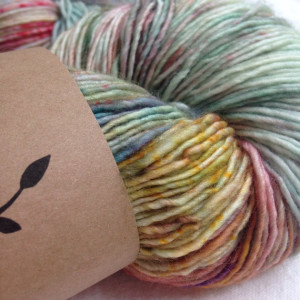
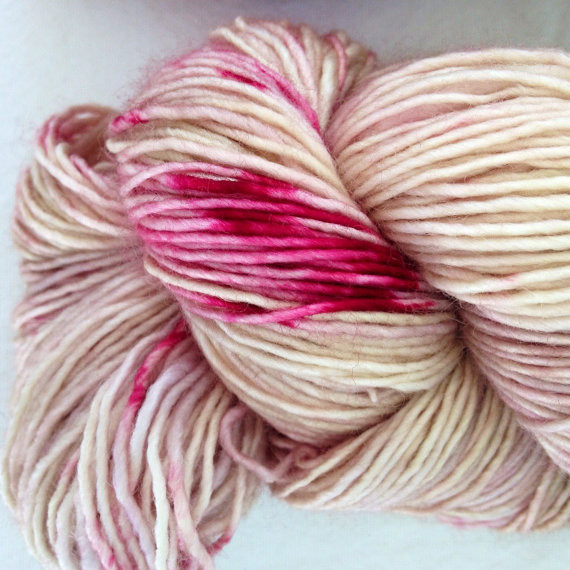
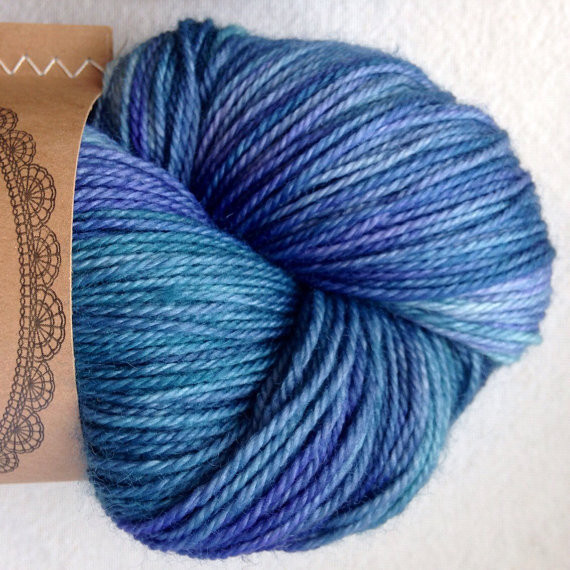
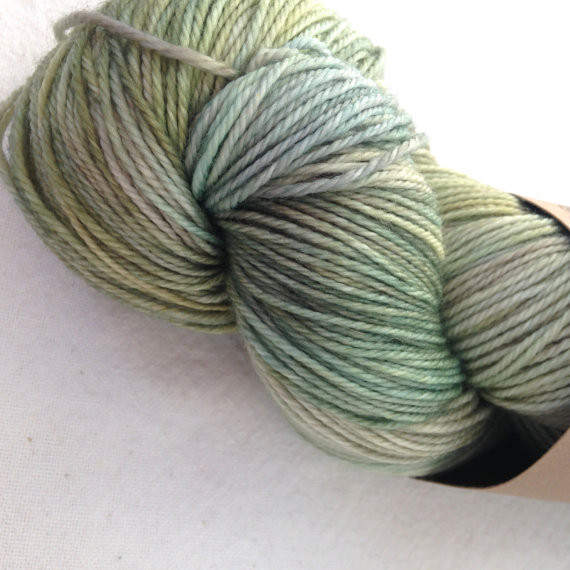
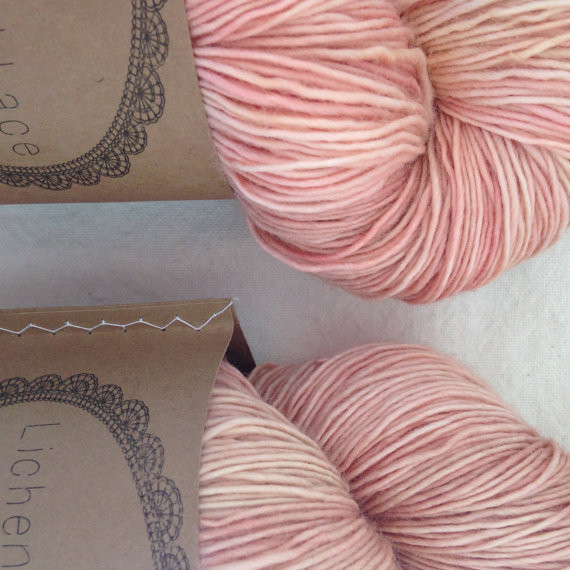
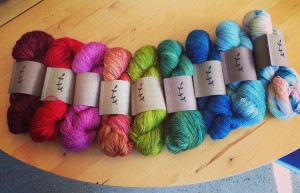
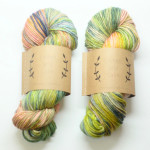
Megan does her magic with four different yarn bases.  Those of you who are frequent shoppers will recognise the single ply fingering and the worsted weight; one major benefit of this KAL is that it will give you a chance to try out something from the other two bases.  Each skein comes with a whopping 115 grams – 15% more than the average skein.  Just some of the gorgeous colourways are seen here, but to browse the full compliment, visit: Lichenandlace.com and make sure you see all three pages!
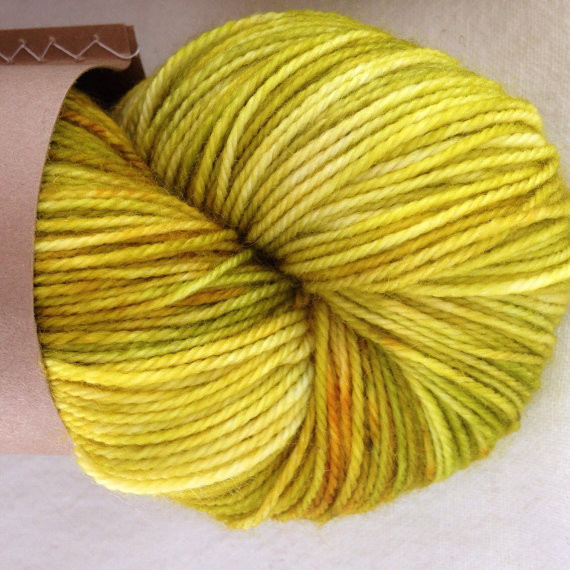
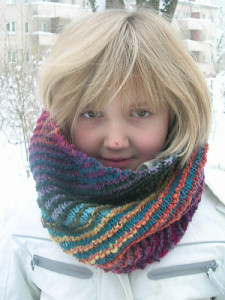
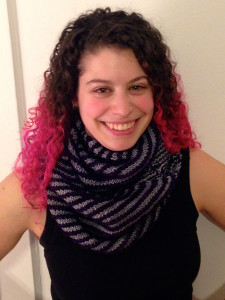
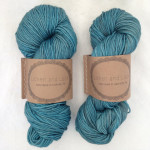
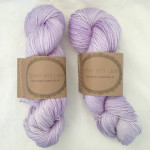
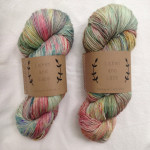
1ply1 ply 
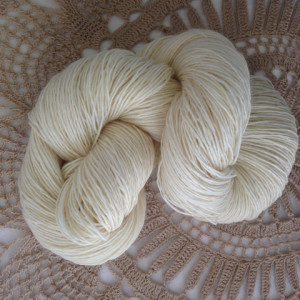
Superwash Merino Fingering Weight

Megan says, “This yarn is a 1ply fingering weight with 475 yards in 115 grams. It is 100% Superwash Merino and is a great yarn for shawls. I love the organic looking twist of this single ply. Very soft, this yarn is the best for shawls, but also a great choice for scarves, cowls, and other accessories.”

Suggested patterns
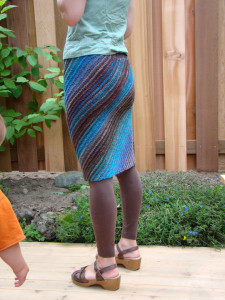
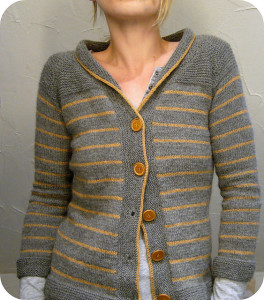
Knit: Paulie by Isabell Kraemer
The large sections of stockinette in this sweater give the
knitter an opportunity to show off the beauty of this plush yarn, and the stripes allow us to choose two complime
ntary colour from the many potential combinations of Megan’s colourways.  Pattern requires 4-5 skeins.

Crochet: Diamonds in the Rough by Michael Snow
This pattern features some beautiful textures that would be accentuated by the single-ply fabric.  Pattern requires only one skein!
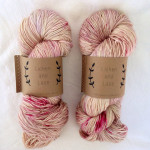
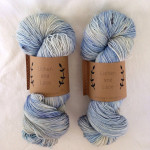
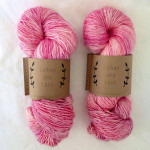
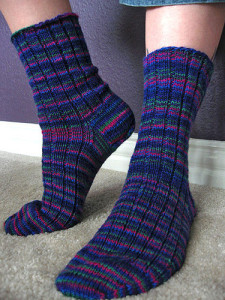
PaulieDiamonds in the Rough

80/20 Sockbase - 80-20 fingering

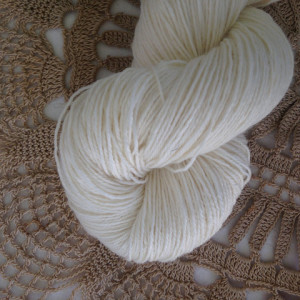
Megan says, “This yarn is a perfect fingering weight with 420 yards in 115 grams. It is strong with 20% nylon, and totally machine washable with 80% super wash merino. A very soft yarn, perfect for socks of course, but also shawls, colour work, and baby knits.”

Suggested Patterns
Knit: 
Basic Ribbed Socks by Kate Atherley
Now’s your chance to try out socks for the first time!  Allow these brilliant colourways to inspire you.  We recommend Kate’s clear and instructive pattern for first-time sock knitters, and if you’re feeling trepidatious, join our Top-Down Socks class with Kate on April 7th and 14th.  10% off the class for participants of the Lichen and Lace KAL!  As usual, one skein of sock yarn is enough for a pair that fits most adult-sized feet.

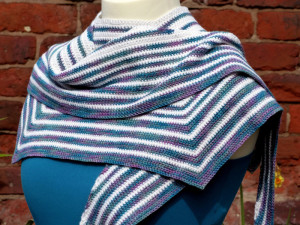
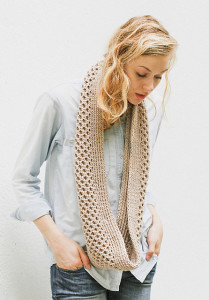
Crochet: Pacific Rim Shawl by Esther Chandler
Esther Chandler’s pattern features some fun stripey play, and offers the opportunity for experimentation with edging.  Chandler gives some interesting pointers and advice on how to alter this shawl for a larger or more different shape.  Factoring in potential alterations, this shawl could use either 1 or 2 skeins of each chosen colour.
Basic Ribbed SocksPacific Rim

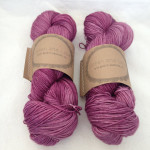
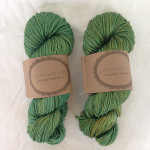
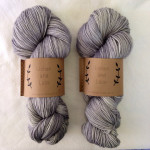
4ply Superwash Merino Worstedbase - worsted

Megan says, “This yarn is a true worsted weight with 200 yards in 115 grams. It is well balanced with a 4 ply construction. 100% Superwash Merino. A very easy knitting yarn with crisp stitch definition. Perfect for sweaters, mittens, hats, and so much more.”

Suggested Patterns
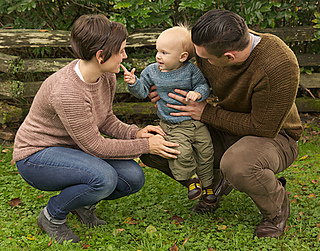
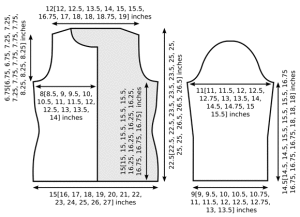
Knit:
Flax by tincanknits

Flax has been extremely popular ever since it was published in 2003, but recently it’s had a resurgence amongst some of the Yarns Untangled regulars.  This is likely due to its easy construction, clear instruction, and wide range of sizes available, not to mention the unisex design.  Whether it be your first or 100th sweater, this pattern is not to be skipped.  Depending on your chosen size, Flax requires anywhere from 2 to 9 skeins.

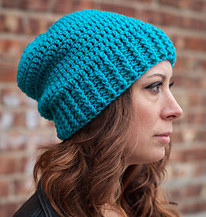
Crochet: Shanty Hat by Robin Devine
Last year on a Valentine’s craftathon, this was Amelia’s favourite pattern.  She made two of them during the marathon, and it was her first ever successful crocheted hat.  Cute, simple, and easy to follow, this pattern is a lot of fun and works up quickly.  Choose from one of four sizes, but even the largest uses less than one skein.
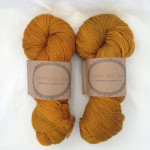
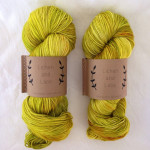
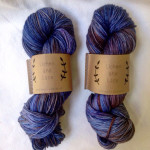
FlaxShanti

80/20 Bulkybase - 80-20 bulky

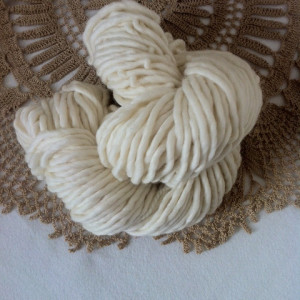
Megan says, “Your new favourite bulky yarn.  One skein has 76 yards and 100 grams – enough to knit a hat from one.  This yarn is a single ply of 80% superwash merino and 20% nylon making it super soft and squishy.  Best for making hats, cowls, and scarves.  Knits up super quick on size 15 (10mm) needles!”

Suggested Patterns
Knit:
Honey Stitch Cowl by Davine Choy
This “classic yet modern” design is a perfect combination with Lichen and Lace single ply bulky.  The 3D twists will be brought to life by the plush softness of the yarn.  Suitable for man, women, or child, it would use 4-5 skeins, depending on how large you’d like it to be.

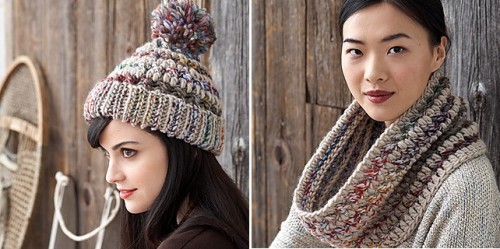
Crochet: 
Big Stitch Hat & Cowl by Patons
Chunky and delicious, these two patterns are a great use of this sumptuous bulky yarn.  Make the hat with one skein of each colour, the cowl with 2 skeins of one and 1 of another, or the whole set together.  Big is in!

Honey Stitch CowlBig Stitch Hat & Cowl by Patons

Prizes 

Like all good KAL hosts, we are offering prizes in the below categories.

Best original design – must be completely from your own head!  We’ll be happy to offer pattern editing and help with Ravelry publishing once you’re done.  Prize: a digital copy of Kate Atherley’s Pattern Writing for Knit Designers.

Most individual projects completed – since single skein orders are possible, this is an easy prize to win!  Remember, socks only count as one project 😉  Prize: a gift card for $25 to be spent at your leisure at YU.

Best lesson learned – everyone wants to hear about your progress!  One of the best things about sharing your work with others is learning from each others mistakes and experiments.  Use the Ravelry thread to share your thoughts, feelings, and breakthroughs.  Prize: a gift certificate for $50 off a class at YU.

Random draw – and of course, to throw chance into the mix, we will choose one random entry from all of the finished projects to receive this prize: some beautiful handspun yarn from Amelia and Brenna.

The Knitty Gritty (LOLZ)

  • From the date of publishing this post (February 22nd, 2016), you have two weeks to place your KAL order with us.  Use Ravelry, email (info @ yarnsuntangled.com), phone (416 603-2338), or see us in person.
  • We require either a 50% deposit or a credit card number in order to secure your order.  Of course, you may pay for the entire thing up front, if you wish.
  • A 10% discount will be given on any special order of four skeins or more, regardless of base or colourway.  Please note that this discount is only applicable to yarn that is part of the special order, and not to yarn that is on the shelves.
  • The KAL begins on the day that our order of yarn arrives from Sackville.  We expect it approximately two months (or less) after the the day we place the order.  Don’t worry, we’ll make a fuss online and in person to make sure you know it has arrived and is beginning.
  • In order to be considered for entry, crafters must join the Ravelry thread and announce which yarn you’ve ordered.  Once the project(s) is/are finished, you must post at least one picture of it.  If you’d rather, come see us in person and we’ll get a snap of it for you!
  • If you don’t have a Ravelry account, send us a quick email at info @ yarnsuntangled.com announcing your intention to participate.  We’ll make sure you’re kept in the loop.
  • And again, so that it’s here too, the colourways can bee seen here, and the bases can be seen here.

That should do it for now.  Stay tuned to the Ravelry thread for updates and to check out everyone’s great ideas and progress.  Another blog post announcing the official start will follow soon!
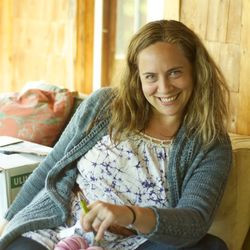
-Amelia and Brenna

The Making Of: A Cardigan, pt. 3 – Blocking

Read part two here.
Read part one here.

The blocking process has always been a bit elusive to me.  I’ll do it of course, because I know I’m supposed to, and I know that it’s essential, especially for a garment like this one.  But I will admit that, in the past, I have skipped blocking my finished objects as often as possible.  This is not for any good reason other than basic impatience to have the project finished (there’s nothing like the satisfaction of changing a Ravelry status from “WIP” to “FO”).  But just like so many other aspects of knitting and crochet, I’ve learned the hard way not to cut corners (some of you may recall the lovely gold and blue sweater that turned into a longish indoor jacket in 2014.  Pictures are pre-blocking.  It’s a good 20% bigger now since the cashmere bloomed.  Wash your swatches!).

As of yesterday, I had finally finished each section of the sweater: back, left front, right front, and both sleeves.  What remains to be completed is the seaming (sewing up the sleeve seams, and joining all five pieces together), the button band, and the folded hem at the bottom.  But before the seaming can begin, the five pieces must be blocked.  The reasons for this are many, but the few that stick out most to me in my experience are as follows:

  1. They just look way better.  I don’t know about you, but when I’ve finished a piece of a garment, especially one that is mostly stockinette, it curls and rolls and flops around and people say, “oh are you making something for a child?”  Post-blocking, they look much more like they’re supposed to, and I’m able to say, “why yes, that is a sleeve!” which is always gratifying.
  2. They are much easier to seam together.  Washing and drying allows the stitches to get up, stretch, and go for a walk.  When they come back, they feel much better and are more willing to sit a row quietly behaving themselves than they were before.  This makes it easier to pick up stitches, and to find corresponding spots from sleeve to body, and front to back.  Un-blocked pieces are more likely to cause trouble in the seaming process and you could etempestSCHEMnd up having to rip out the sewing and re-do it, which is way less fun than ripping out knitting.
  3. Measuring.  If your pattern is worth it’s salt, it will include a schematic (see Ann Weaver‘s Tempest schematic included here).  At this point, you can grab your measuring tape (or ruler, or metre stick, or tapeline) and see how close your measurements match where they’re meant to be.   The fun thing is, if your piece doesn’t quite lie at exactly 11.5″ wide (as my sleeves should be), now’s your chance to stretch the piece a bit and pin it down.  If you’ve used natural fibres, it should dry and hold that measurement better than if you hadn’t pinned and measured in the first place.

I feel pretty confident in my measurements of my pieces.  The back and fronts are both longer than they should be, but that’s because I added 12 rows to each of them.  I have a weirdly long torso (and stubby little legs!), so I often make tops and sweaters a bit longer to help me not look too freaky.  Since Tempest is written in stripes, I simply added an extra “stripe” to all the pieces.  This will change the number of stitches I need to pick up for my front bands, but since the pattern doesn’t give me a set amount, I needn’t worry.  More on that in part 4.

Behold my blocked and measured cardigan pieces!

Here we have all my bits, drying out and ready to be seamed.  They are now hiding under a beach towel since my feline roommate loves bits of yarn and pins beyond the fair points of reason and safety.  I think the bit I’m most proud of is the right front.  Note the cute little pink pocket!  I’ve never put a pocket in anything before, but my friend Kathryn is working on a wicked man’s cardigan and used a skeinette of Rhichard Devrieze‘s Peppino (only $4 in store!) to line the pocket with a complimentary colour, and I stole her idea.  The skeinette was enough for a pocket and a bit of leftovers – I bet I could have done two pockets, but I decided one was enough.  Here’s what it looked like pre-wet blocking:

Tempest pocket - pre blocking

Hopefully the front will lie a little flatter once it’s dry and the lining is sewn into place, we’ll find out together!  And as a bonus for reading this far, I give you my roommate Felix helping the pocket to lie flat.  Now that I’ve gotten over the blocking hump on this project, seaming never takes me too long.  It’s too much fun to pull everything together, and I’ll share a few tips on the next post about how I like (read: how Brenna taught me) to pick up stitches for the front bands and bottom hem.  xo!

Photo 2016-02-10, 12 01 55 PM
Helping


The Making Of: A Cardigan, pt. 2

Read part one here.

You’ll recall that at the conclusion of my last post, I had guessed that a 4.5mm needle should be the right size for me to get gauge.  The old me of a few years back would have simply used the data collected from the 3.5mm and 4mm swatches, extrapolated that a 4.5mm would do the job, and simply started the project with the largest size, not bothering with a third swatch.  However, partially due to a few hard lessons learned in the past few years, and partially because y’all are watching, I took the straight and narrow route.  Behold swatch number 3 (with 4.5mm needles):

Photo 2016-01-24, 1 18 48 PMDue to advice from a very wise friend, via Indigodragonfly’s article, “Swatching, or How to Avoid Getting a Sweater the Size of Manhattan (The Drink or the City),” I rewashed the old swatch along with the new, pressed out the extra water with a towel, allowed the to dry, and then hung them up overnight.  After remeasuring, I’ve actually decided instead to work with the 4mm needles after all.  I found the larger gauge to be rendering a fabric I wasn’t 100% happy with, and after being hung to dry, my original swatch met gauge exactly.  Take that old me of a few years back!

Since I last wrote, I’ve finished both sleeves and started on the back of the sweater.  After a bunch of research that had me peering closely at project photos on Ravelry and rereading the pattern, I realised that the cuffs of the sleeves are designed with just the stockinette cast on edge – no ribbing, no seed stitch, no nothing.  While I have no problem with this look in theory, since the bottom edge of the sweater uses a folded hem, I wanted to have the sleeves match.  Much like quite a few Ravelers have done, I used a provisional cast on and smaller needles, did 4 rows in stocking stitch, knit a row on the wrong size, and then switched to the larger needles to turn the hem.  Once I’d knit enough rows for the folded hem to line up with the needles, I took the provisional stitches off the scrap yarn, placed them on the smaller needles and knit the two rows together.  This method saves you from having to sew the seam by hand afterward.

Photo 2016-01-24, 7 55 12 PM

I will admit that I’m a tiny bit concerned that the hem will flip up a bit, but that can be counteracted by blocking and when sewing the seam.  Or so I’m telling myself.

I have left the cast on for the back and the fronts as just the stockinette cast on because the pattern has you sew the three pieces together and then pick up stitches to do a folded hem going downward.  This way, the hem will all be in one piece and pull the whole thing together at the bottom.  This will also help to me to clean up the bottom edge, if it needs cleaning up.

Have any of you got an argument for or against rolled/unfinished hems?  Have you got a question about my project, or some sweet sweet advice to offer?  Leave a comment below to get the discussion going!

Next update soon.

xox,
-Amelia

The Making Of: A Cardigan

One of the absolute best things about working in a yarn store is that we often get to be there, from beginning to end, for a huge number of projects.  Sure, we don’t knit or crochet them ourselves, but we get to be a part of choosing the yarn, the pattern, often the needles, even swatching, customizing, mistakes, disasters, solutions, casting off, blocking, and if we’re lucky, trying on the final item, or giving it a snuggle when you the customer bring it back into the store to proudly show it off.

Today, I’d like to introduce you dear readers to a new Yarns Untangled blog feature called “The Making Of.”  Through this feature, we’ll flip the situation around and take you on a journey through the birth, maturation, and arrival at adulthood of an entire project, warts and all (I’m hoping for at least a few warts, because projects are way more interesting when there are challenges and we learn something, right?).

Ok so here we go.  Your official introduction.  World, meet The Cardigan:

The Yarn: Mineville Wool Project #2701 Angora Wool
The softest and just a bit fuzzy, we’ve all been in love with this bunny yarn ever since it arrived.  At 480 metres for an 100 gram skein, the mileage is undeniable, and the talented ladies of Mineville have sent us a gorgeous array of colours.  Until very recently, we had wrongly assumed that this yarn fell under the fingering weight category, but according to Ravelry, it’s actually more like a DK.  After swatching with it (details below), I can report that due to its angora content, this yarn can be used as either a fingering, sport, or even DK weight yarn if treated right.  The mileage, colour range, and flexibility of this stuff renders it a perfect sweater yarn.

The Pattern: Tempest cardigan by Ann Weaver, Weaverknits
I have had this sweater queued for years.  The shape, cut, shoulder line, and general aesthetic are right up my alley.  The only reason I’ve skipped over it for other patterns is because I found the gauge requirement daunting.  This knitter had a hard time wrapping her mind around getting a 20 stitch (and 30 row) gauge with a fingering weight.  For those who are reading this and going, “…huh?”: a brief explanation.  I won’t go into a lecture about gauge, that’s for another blog post and should probably be written by Brenna because she knows all the things.  But I will say that fingering weight yarn, depending on the needles you’re using, usually yields a gauge that is closer to the 24-28 stitches per 4 inches range (even 30, if you’re making socks).  Which means that in order to get a 20 stitch gauge (a more standard gauge for thicker, worsted weight yarn, in my humble opinion), I’d need some much bigger needles than I’d usually use with fingering weight, thus yielding a loose and less-structured fabric than I like for my sweaters.

Enter: Mineville Angora.  As stated above, it’s tough to label a weight on this yarn because it’s so flexible, but Brenna and I were both pretty sure that I’d be able to make this pattern and yarn match because angora is notoriously fuzzy and a bit bloomy, meaning it will grow to accomodate a looser fabric.  That means it’s time for the swatch.  For those unfamiliar with swatching, we recommend the Knitty.com article on the subject, which says it infinitely better and more thoroughly than I could.  I have learned the hard way, and way more than once, that swatching is a must.  I’m not here to lecture you, but just trust me on this one.  Here’s my fuzzy little square:
IMG_3251

All right, so “square” isn’t exactly the most accurate terminology that I could have used; there are two needle sizes at play here, so perhaps it’s a gentle trapezoid.  This guy was cast on and banged out in a few minutes.  I then cast off, soaked it in lukewarm water, and lay it flat on my desk to try overnight.  Washing matters because you aren’t not going to ever wash your sweater, right?  And once a fabric is washed, it can behave rather differently than before, so we are better safe than sorry.

What we see here is a test of two different needle sizes to see which one would be closer to the pattern’s requirements.  The bottom half is knit with a 3.5mm (US 4) and the top with a 4mm (US 6).  Usually I would also have done a 3.75mm one as well, but I didn’t bring that set of tips with me to Ottawa for Christmas because I wasn’t thinking.  The pattern calls for a 4mm anyway, so the data on top will be most telling.  The bottom half is more to give me a fuller picture of how this yarn behaves in general since I’m not familiar with it.

The two sections are separate by most of a line of knits on the purl side.  I probably should have completed the line as it does seem to have made things look a bit funky, being incomplete.  MEH.

After careful measurement and remeasurement (counting stitches and rows in a couple different spots on the swatch), I get 11 sts/2″ on the bottom half and 10.5 sts/2″ on the top (22 and 21 respectively).  In terms of rows, it’s coming out at about 34 rows = 4″ on the bottom and 32 rows = 4″ on top.  So for those scoring at home, I haven’t hit gauge.  I’m close though!  So before starting properly on the sweater, I’m going to need to do one more swatch.  My expectations are that a 4.5mm (US 7) needle should do the trick.

Stay tuned for the next installment of The Making Of: A Cardigan, which I’m hoping will consist of swatch the second and casting on for reals.  Thanks for reading!

To track this project in real time, check out the Ravelry project page.

Knitted Christmas Ornaments: A Kit

For our first official foray into kits, we’re happy to announce that these sweet little numbers are now available in store.  There’s something especially cozy about a knitted tree ornament, and these are some of the coziest.  The kit features 11 possible designs (8 easy charts, and 3 more challenging ones), all from the mind of knitting guru Kate Atherley and they are currently only available as part of this collection.

Since most of the charts are relatively uncomplicated, this kit is suited to any knitter comfortable with knitting in the round and with basic colourwork.  However, if you’re feeling a little tentative but would still like to knit yourself some festive decor, join us on Thursday, December 17th for a class that will guide you through your first ornament and get you set up to make more (the kit includes enough material – yarn and stuffing – for two ornaments).  And as if that wasn’t tempting enough, we’ll make sure you get at least one cup of delicious mulled cider to accompany your learning experience.

We’re working on more kits as we speak including two featuring designs by the ever-so-talented Laura Chau, so if Christmas (or balls) ain’t your thing, stay tuned for more curated combos of yarn and patterns.  And if Christmas is your thang, make sure your family knows this is on your list.

20151129_153401 20151129_153349_crop 20151129_153539_crop

New Yarn: Lichen & Lace

When we realised that Megan Ingman, original owner and heart and soul of Lettuce Knit in Kensington Market, had ventured into the fine art of dyeing yarn under the name “Lichen and Lace“, we didn’t miss a beat.  Not only is she working with soft, versatile, and surprisingly affordable bases, her eye for colour is truly one of the best we’ve come across, ever.  Our order was put together and sent in seconds.  The hardest part was choosing colours – if only we could have every single one!

Megan Ingman
Megan Ingman

Megan opened Lettuce Knit in her 20s and ran it with a few dedicated staff for quite a few years until 2013 when she sold the business and moved to Sackville, NB.  The intention was to seek a calmer and more relaxed life for her young family, and a small home-run dyeing studio fit beautifully into her plan.  Obviously east coast living is suiting her perfectly, because she has grown a unique and stunningly beautiful collection of colourways.  Now Megan can be found every Saturday morning in the Lichen and Lace booth at the Sackville Farmer’s Market.

If you can’t make it to Sackville anytime soon however, we are currently the only store outside of Eastern Canada that is carrying Lichen and Lace yarns, so please come see (and feel!) for yourself!  Out of her yarn bases, we chose the super soft single ply fingering weight superwash merino, and the lush 4ply worsted superwash merino for now, but we have high hopes of being able to bring in the 80/20 bulky in the near future!  Everything about this yarn suits Yarns Untangled perfectly.  From the hand-stitched labels, to the luscious textures, to the remarkably reasonable price, every quality of Lichen and Lace has us convinced that it will be a staple on our shelves as long as Megan keeps producing!

Clover Orchid blue lagoon lichen Calm Waters Citron faded rose huckleberry


Announcing our first knitalong: The Lanesplitter Skirt

Welcome to our first ever knitalong (KAL)!  We’ve chosen a pattern that has long been one of our very favourites: The Lanesplitter Skirt, by Tina Whitmore, published in Knitty.com Issue #32, First Fall 2010. For those who have not participated in a KAL before, the way it works is that everyone uses the same pattern and we knit our projects in tandem, but each crafter creates their own perfect project using the yarn, needles, and colours they prefer.  Participants can be our most regular of regulars, occasional customers, first timers, or even knitters from across the world who want to join in.  Ravelry will be our home base, and to be officially entered, you must join the Lanesplitter KAL thread.  We’ve got a start date (now!) and an end date to aim for: December 31st.

This skirt perfectly suits a group project since it is easily adjustable for different yarn types, size, fit, and personal style.  This beginner-friendly pattern is surprisingly simple: a rectangle knit from one corner to the other on a diagonal.  Being knit on the bias in combination with the stretchy garter ridges allows the skirt to hold its shape much better than usual knit fabric would. This is a great thing for those of us with lots of hips and butt, or those of us who enjoy a good sit now and then without their skirt going saggy in the back!

Non-skirt-wearers, take note: this pattern is easily adjustable for a variety of projects (scarves, cowls, blankets, pillows etc.).  See the pics at the bottom of this post for inspiration!

The designer suggests Noro Kureyon as the perfect yarn for the pattern, and since we agree, we’ve ordered a whole lot of it in our favourite Noro colourways.  It arrived Wednesday, so come on down and choose yours! If you’d prefer to go in a different direction, this pattern can truly be knit with any weight of yarn as long as the needle is the appropriate size.  Join our KAL thread on Ravelry and ask any questions you may have about finding the right yarn and needles for this project.  This thread will also be a great place for everyone to share photos of their works-in-progress (WIPs), ask for help, or simply chat about their experiences with this lovely pattern.

Although it’s not a race in the slightest, prizes do always make things more interesting, so we are offering some great stuff to a few lucky participants: handspun yarn from both Brenna and Amelia, coupons for classes at Yarns Untangled, some of our most prized stash yarns, great stuff from the YU shelves, YU swag, and more.  Stay tuned for specifics on these.  The prize categories will be:

  • The most ingenious use or alteration of the Lanesplitter pattern (think as far outside of the box as you can!)
  • The most glorious mess up and brave recovery.  Be fearless knitters!
  • The knitter who makes the most Lanesplitters!  Do a skirt, two skirts, some pillows, a scarf, just cast off the most projects.
  • Hookers, a crocheted Lanesplitter would be marvelous.  A prize for the coolest one!
  • And of course, to keep things interesting, a random participant will be chosen from amongst the knitters who finish their project by December 31st.

*Note: anyone is welcome to participate, but to be eligible for a prize, at least some of your yarn must be purchased from YU.

A KAL is a great way to try something new, meet new knitters, and to get inspired by what other people are making.  And if you’re one of the over 3000 knitters who’ve already made this pattern, you should still feel free to join us!  Perhaps a Lanesplitter in black to match your entire wardrobe, a shorter skirt than before, a longer skirt than before, one with crazy stripes or a demure combination of your favourite colours.  As always, we are here to help guide you if need be.  Come in and ask questions, or join the Sunday Drop-In Clinic for more extensive help.  The options here are endless, and that’s why we’ve chosen Tina Whitmore’s Lanesplitter Skirt for our first KAL.  Join us!

For inspiration, check out some of these great projects from Ravelry:

wollschtig's "my first knitted skirt"
wollschtig’s “my first knitted skirt”
MatisseEtMoi's "Mermaid's Skirt"
MatisseEtMoi’s “Mermaid’s Skirt”
Marzanka's "small striped skirt - Bee-like"
Marzanka’s “small striped skirt – Bee-like”
MamaIke's "My first skirt"
MamaIke’s “My first skirt”
mabuli's "Lanesplitter Cowl"
mabuli’s “Lanesplitter Cowl”
tamisuzy's "Lanesplitter Infinity Scarf"
tamisuzy’s “Lanesplitter Infinity Scarf”
nanalb's Pynta trädet
nanalb’s Pynta trädet
Sailor1993's "Lanesplitter-Loop Evergreen"
Sailor1993’s “Lanesplitter-Loop Evergreen”

Why We Did It

Throughout this process, one of the first questions that almost everyone asked us was something along the lines of, “What made you decide to open your own store?”  That’s of course not quite what they mean; some of them mean, “What on earth do you think you’re doing, in this economy?” or “That’s going to be a lot of responsibility, are you sure you’re ready for it?”

Speaking for myself, it never really seemed necessary to me to put into words why we were doing this.  To me, it was obvious: for the yarn!  What knitter or crocheter hasn’t admitted to themselves that they have enough yarn to stock an entire shop?  By owning our own store, we would be able to buy exponentially more yarn than ever before, and obviously there isn’t anything that could go wrong with that.

So far, the benefits of being a professional yarn buyer have proven to be better than even I could have imagined.  We’ve stocked our shelves with goodies from so many of our favourite dyers (Riverside Studios, NBK, Mineville, Caitlin Ffrench, Malabrigo), and we have even more on the way (Rhichard Devrieze, Lichen and Lace, Indigo Dragonfly, and more).  Not to mention the awesome factory-produced yarns we’ve got, such as Cascade, Lang, Borgo de’ Pazzi, Mirasol, Noro, and the list goes on.  I get to spend my days surrounded by colour and texture and softness, and it’s wonderful.

But after all of this, I have something I have to confess.  I don’t think that it’s really for the yarn.  Don’t get me wrong, the yarn is awesome, but after being open for a little over a month, it isn’t the yarn that greets me every day with a smile and a hug.  It isn’t the yarn that spent an entire weekend cleaning, plastering, sanding, and painting the store.  It isn’t the yarn that got in the truck with us to move furniture in from all across the city.  It isn’t the yarn who donated coffee machines, plates, cutlery, shelving, cups, and a kettle to get us operational in the kitchen.  And it isn’t the yarn who designed our logo, took our photos, built our website, stored furniture in their living for a month, and worked tirelessly to make sure that we weren’t alone in this set up process.

As I write this, I’m sitting at a Wednesday evening stitch night surrounded by new friends and old, men and women, each with a set of needles or hook in hand, and each creating a beautiful thing.  The chatter is warm, kind, friendly (and usually pretty informative!), and I feel completely safe and at peace.  As people come and go, there are loud greetings, catching up, meeting new people, learning new skills, and generally being bad influences on each other.  As I write this, I’m realising that it truly isn’t for the yarn at all that we did this, but that it’s for this, for the warmth, the kindness, the community.

So I guess what I’m trying to say is, the more I think about it, what made us decide to open our own yarn store was that we needed to make sure we had a home where amazing people and beautiful yarn can come together.  Thank you to each and every one of you who helped us get set up, and thanks in advance to those who are planning on coming to see us soon.  We can’t wait to meet you!

-Amelia

Newer Entries »