Read part three here.
Read part two here.
Read part one here.
Ok folks, it seems we made it all the way to the end. It’s just over two months to the day since I cast on for this sweater, and considering a polished off a few other projects along the way, that’s not a bad finishing time, if I do say so myself!
Picking up where we left off last, the bits and pieces of the sweater had completely dried, with minimal cat hair present. Here they are ready to be seamed.
If any of you have blocked straight edges with pins before, 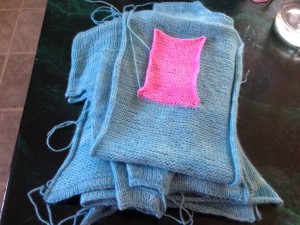 you may recognize the tell-tale “pooks” on the sides of the pocket lining from where I had the pins in the fabric. This kind of thing is the opposite of a problem if you’re blocking a lace shawl that’s got points all along the
bottom, but when you’re looking for a clean edge,
my experience has led to simply using blocking wires with my pins. I did some quick (real quick and impatient) googling to see if I could find some writing on the topic, or even some pictures, but nothing came up before I got distracted. If you’ve got photos or a favourite tutorial, share it in the comments below! Luckily, the pocket is on the inside and when I sewed it in place, the pooks became a non-issue.
Next begins the seaming. I used to hate this part because it’s usually when my sweater stopped looking awesome and started looking like it was joyfully completed by the first human ancestor to ever discover that she had opposable thumbs. But ever since Brenna properly showed me how to execute a decent mattress stitch, the seaming became the most exciting. Seriously, I’ll do your seaming for you in exchange for hugs and caffeine. Check it:
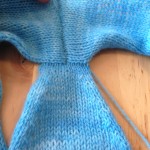
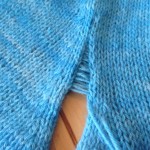
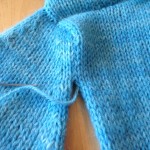
In the first picture, you see vertical to horizontal seaming, which I find to be the trickiest and am still perfecting. I will say that on this sweater and the last top I did like this, I found there to be two distinct corners on the top of my sleeve cap. It’s not really a look I love, and I did try and go over this to round out the corners a bit, but I didn’t do a great job. In the future, I will run the seam a bit farther down on either corner. Next the mattress stitch runs down toward the armpit and then you see it pulled closed. Click on the video below and watch it happen, live!
Mmmmmm, if that doesn’t send shivers up your spine, then I don’t know what will. My favourite video tutorial for mattress stitch is the KnittingHelp.com video linked above, but a good picture tutorial can also be found on the Purl Soho website. For the vertical-to-horizontal seaming, check out this explanation from knitty.com. Here’s some more seam porn:


All right, that’s enough, pull yourselves together.
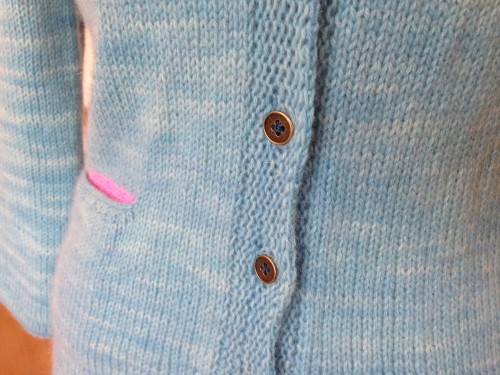
Once all my bits and pieces were in place, it was time for the button band. The button band involves picking up a billion stitches from the bottom right corner, round over the back of the neck, and down to the bottom left corner. I did this late at night in bad lighting, so I haven’t got good pictures, but I will say that the pattern had me picking up one stitch for every two rows, and I was rather skeptical. The more usual ratio is two stitches for every three rows, and fewer stitches means a smaller button band and a higher risk of buckling the rest of the fabric. However, usually knitty.com knows what’s up, so I went with it.
The short story is that it was totally fine. You can see here 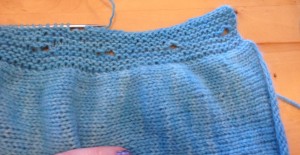 that it didn’t look super promising at first, but after a good watery steam, the garter band relaxed into place and looked great. Most animal fibres will do this, but it seemed to me that the angora in this yarn responded particularly well to this steam blocking approach. Those scoring at home will notice that the pattern called for a skinnier button band, but I’m not a skinny button band type of gal, whatever that means.
After the button band, I did the hem on the bottom. This pattern calls for a simple four-row rolled hem, but since I had put a more full 10 (or so) row folded hem  on the sleeves, I wanted to mimic that on the bottom of the sweater as well. Since I had some pink leftover from the pocket, I threw some of that in on the turning row, making this sweater a bit more special. I wish this had occurred to me when I did the sleeves because they don’t match, but there ain’t no way I’m going back that far or duplicating the pink on top. It will simply just look like this.
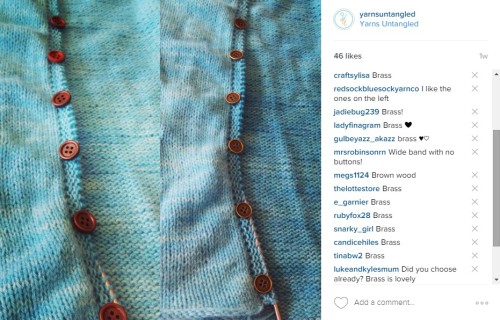
Lastly, buttons. I don’t know about you guys, but I have several sweaters that sat for months (or are still sitting!) without their buttons because I simply couldn’t be bothered. Obviously lining up the buttons with the buttonholes is annoying enough that I will put off wearing my wearing, but since this is a public project, I can’t so much get away with that. Plus choosing buttons gives me anxiety, so I turned to Instagram for help.
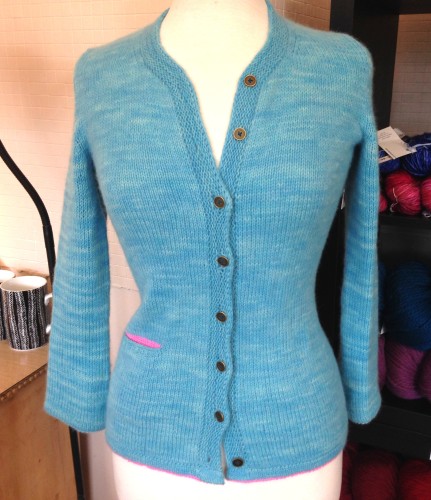
So finally, the buttons are on, the sweater is blocked, and it’s all ready to wear! Of course I don’t have pictures of it on my own self yet because I wasn’t wearing the right undergarments, but you can get an idea of how it would fit with a bit more ease and a bit less arm by having a look at it on Judy the judy.
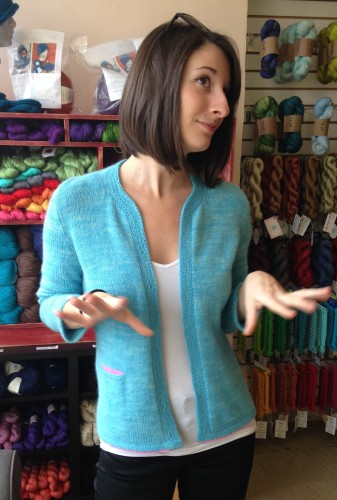
Alternatively, here it is on a real live human. Thanks Nonna!
So that’s it! Thanks for coming with me on this journey, and stay tuned for the next in our Making Of series.
HI from JAPAN.
i saw you and your shop on
JAPANESE TV show.
i hope someday i can visit your shop!!
This is gorgeous, holy cow. So sassy with the little bits of pink, here and there. I hope I can knit something like this, some day. Hey, it would be nice to knit any sweater, first, then (eventually) a lovely one like this. Seam porn, indeed! Thank you for sharing. – S.
Can I take you up on that hugs and caffeine offer? Or maybe just for some help figuring this whole seaming thing out. Never made a sweater before and there are cables everywhere!
Any time! Come on down and see us, and if you need official help, we suggest the Sunday Drop-In session, that’s a great one.